

NCBI Bookshelf. A service of the National Library of Medicine, National Institutes of Health.
My NCBI Help [Internet]. Bethesda (MD): National Center for Biotechnology Information (US); 2005-.
My NCBI preferences and customization links can be found at the top right corner of the My NCBI homepage.

Users can customize the appearance of the My NCBI homepage display and select their preferences for: displaying the links menu, activating search term highlighting, saving shared settings, setting up and activating filters, and customizing the search results display.
Please write to vog.hin.mln.ibcn@ofni if you have any questions.
Section Contents
- Account Settings
- Common Preferences
- PubMed Preferences
- PMC Preferences
- Gene Preferences
- GTR Preferences
- Nucleotide Preferences
- Protein Preferences
- GSS Preferences
- EST Preferences
- ClinVar Preferences
- MedGen Preferences
- Books Preferences
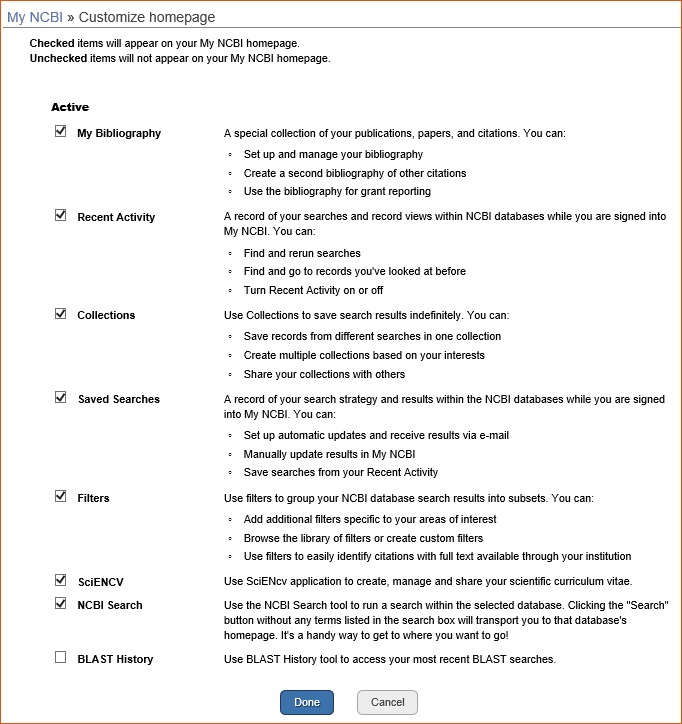
Customizing the My NCBI Homepage
The homepage display can be customized by dragging and dropping each function window to the top or bottom of the page. Each function window can also be minimized or removed from the homepage display. 
Users may select or deselect any of the function windows from appearing in the My NCBI homepage. To deselect any function window, click on the “Customize this page” link and uncheck any of the functions that you do not want to see in your My NCBI homepage.
Account Settings
After signing in to your My NCBI account, click on your username on the NCBI header to access the Account Settings page.

Changing your E-mail Address
To change your e-mail address:
- 1.
Click on your Username to access the Account Settings page
- 2.
Click the “Change” button next to the current e-mail address
- 3.
Enter your account password
- 4.
Enter an e-mail address
- 5.
Click Save.
Note:
- A confirmation e-mail message will be sent to the new e-mail address to activate automatic e-mail updates
Changing your Password
NCBI started the transition to use only federated account credentials for NCBI account login on June 1st, 2021. The deadline for transitioning all NCBI accounts to 3rd-party only login is June 2022. Please read the below FAQs and write to vog.hin.mln.ibcn@ofni if you have any questions.
https://ncbiinsights.ncbi.nlm.nih.gov/ncbi-login-retirement-faqs
Journal publishers who use My NCBI login for PMDM should write to vog.hin.mln.ibcn@rehsilbup for feedback on login or access to PMDM.
To change your password:
- 1.
Click on your Username to access the Account Settings page
- 2.
Click the “Change” button
- 3.
Enter your current account password
- 4.
Enter your new account password and repeat the new account password
- 5.
Click Save.
Changing your Security Question
NCBI started the transition to use only federated account credentials for NCBI account login on June 1st, 2021. The deadline for transitioning all NCBI accounts to 3rd-party only login is June 2022. Please read the below FAQs and write to vog.hin.mln.ibcn@ofni if you have any questions.
https://ncbiinsights.ncbi.nlm.nih.gov/ncbi-login-retirement-faqs
Journal publishers who use My NCBI login for PMDM should write to vog.hin.mln.ibcn@rehsilbup for feedback on login or access to PMDM.
To change your security question:
- 1.
Click on your Username to access the Account Settings page
- 2.
Click the “Change” button next to the security question
- 3.
Enter your account password
- 4.
Enter a security question and answer
- 5.
Click Save.
Linked Accounts
Go to “Linked Accounts” to view or remove partner organization accounts that are currently linked to your My NCBI account. You may also search for a different partner account to link to your My NCBI account.
To view or delete linked accounts:
- 1.
Click on your Username to access the Account Settings page
- 2.
Click the “Change” button next to Linked Accounts
- 3.
To remove a linked account, click on the red X.
- 4.
Click Save.
To link your My NCBI account to a partner account: repeat steps 1 and 2 and search for a partner account. If available, click on the partner organization link displayed. Then, log in at the partner organization page with your partner organization credentials.

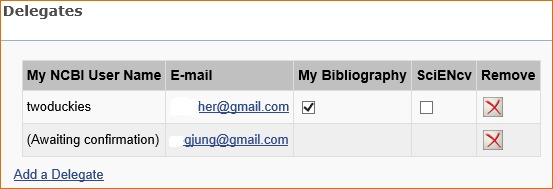
Adding and Removing Delegates
Delegates are persons who are granted access by NCBI account owners to view and manage their My Bibliography collection and/or their SciENcv profile. Delegate invitations are initiated by NCBI account owners.
To add a delegate to manage your My Bibliography and/or SciENcv data:
- 1.
Log in to your NCBI account, and click on your username (top right corner of page) to access the Account Settings page
- 2.
Go to the “Delegates” section and click “Add a Delegate” link
- 3.
Enter the delegate’s e-mail address, and click OK
- 4.
Your delegate will receive an e-mail with a URL that leads to an access confirmation page. For further information, see confirming a My Bibliography connection for delegates.
The Delegates section of the Account Settings page displays a list of all the delegates granted access to either your My Bibliography collection or your SciENCV professional profile, or both. In the Delegates section you may add or remove delegates as well as modify the access granted by checking or unchecking the boxes under the My Bibliography or SciENcv columns. Additionally, delegates can be removed by clicking on the red X.
Creating an API Key
Web services developers and other users of NCBI E-Utilities can create an API key in Account Settings. An API key is required for Web service requests set up to make more than three requests per second to E-Utilities.
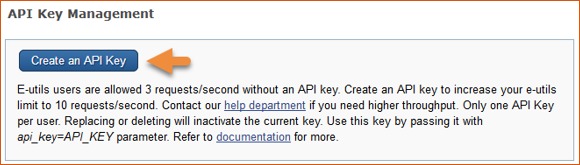
Use the API key generated for your account in your request URLs with the api_key parameter and you will be able to make up to ten requests per second. For example: esummary.fcgi?db=pubmed&id=28933509&api_key= 21abcd97ef62XXXXXXXXXX
Users who need to make more than ten requests per second should contact: eutilities@ncbi.nlm.nih.gov.
To create an API key using your NCBI account:
- 1.
Click on your Username to access the Account Settings page
- 2.
Go to the “API Key Management” section and click the button “Create an API key”
- 3.
An API Key will be generated for you.
- 4.
Click the “Replace” button to generate a new API key. Note that the previously issued API key will be inactivated.
Common Preferences
Highlighting Search Terms
You can choose to have your search terms highlighted in retrieved database records. By default, this option is off, but you can pick one of the ten colors available in the Highlighting section of the NCBI Site Preferences to have your search terms highlighted. Highlighting is only active when you are signed into My NCBI.
Terms other than the one(s) you have used in your query are also highlighted at times. For example, if you search PubMed using the term ‘cancer’, you will also find citations with the term ‘neoplasm’ highlighted. That is because the NCBI search engine has a dictionary of synonymous terms, such as ‘cancer’ and ‘neoplasm’ that are equally considered when you search a database using one of them.
In some cases, you will retrieve PubMed citations that have no highlighting in the abstracts, which means that neither the search term nor a synonymous word was found in the abstracts. However, terms that appear as MeSH (Medical Subject Headings) terms or Substances on a record will be highlighted in the supplemental information section of the citation.
PubMed Preferences
Setting Up PubMed Filters
NCBI databases search results can be narrowed down to smaller groups of data using filters. You can select your preferred PubMed filters to be active every time you run a search. For example, filters can be used to group results into reviews, clinical trials, or citations with free full text links, among other choices. You may also create your own custom filters. There is a limit of 15 filters for the PubMed database. For a detailed explanation on how to set up filters, see Working with Filters.
Selecting Outside Tool
Outside Tool allows libraries to add a link from PubMed citations to a link resolver available at their institution. These links are displayed as icons in the PubMed Abstract display (see image below). In My NCBI preferences for PubMed, users can enable up to five libraries’ Outside tool icons to display in PubMed.
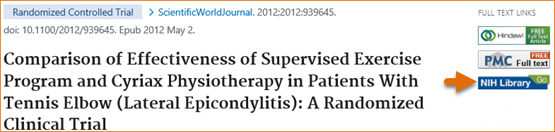
When you click on the Outside tool icon, you are directed to the available services for that citation offered by the sponsoring library. These services might include access to electronic full text or information on local print journal holdings.
To turn on an Outside Tool, click the Outside Tool link under PubMed preferences. Select up to five institutions from the available list and the selected libraries’ icons will display in the Abstract format. For more information, see Outside Tool.
Author Information Display
Author Affiliations appear in the PubMed abstract display below the author names, and it is normally closed by default:
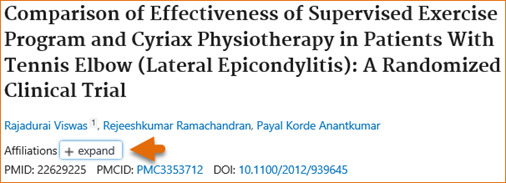
To change the default to make the author information available in the abstract display:
- 1.
Click the link Author Information under PubMed preferences
- 2.
Check Open
Save
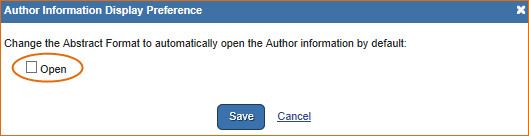
The author affiliation information will be available when signed in to My NCBI.
Customizing the Search Results Display
The PubMed default for displaying search results is the Summary display format. To change the search results to display in the Abstract format, log in to My NCBI and click “NCBI Site Preferences” and then “Result Display Settings” under PubMed Preferences. In the resulting page select the Abstract format. Afterwards, your search results will display in the Abstract format while logged in to My NCBI.

PMC Preferences
Selecting Article View
The PubMed Central (PMC) full text database default article view format is HTML, however, users can select the PMC PubReader as a default in My NCBI. Sign in to My NCBI and click “NCBI Site Preferences” and then “Article View” under PMC Preferences. In the resulting window, select PubReader or Classic (HTML) and click save. Information on PubReader can be found here.

Gene Preferences
Setting up Gene Filters
NCBI databases search results can be narrowed down to smaller groups of data using filters. You can select your preferred Gene filters to be active every time you run a search. You may also create your own custom filters.
There is a limit of 5 filters for the Gene database. For a detailed explanation on how to set up filters in My NCBI, see Working with Filters. To see an explanation of the different types of filters available for the Gene database see Gene Help-filters.
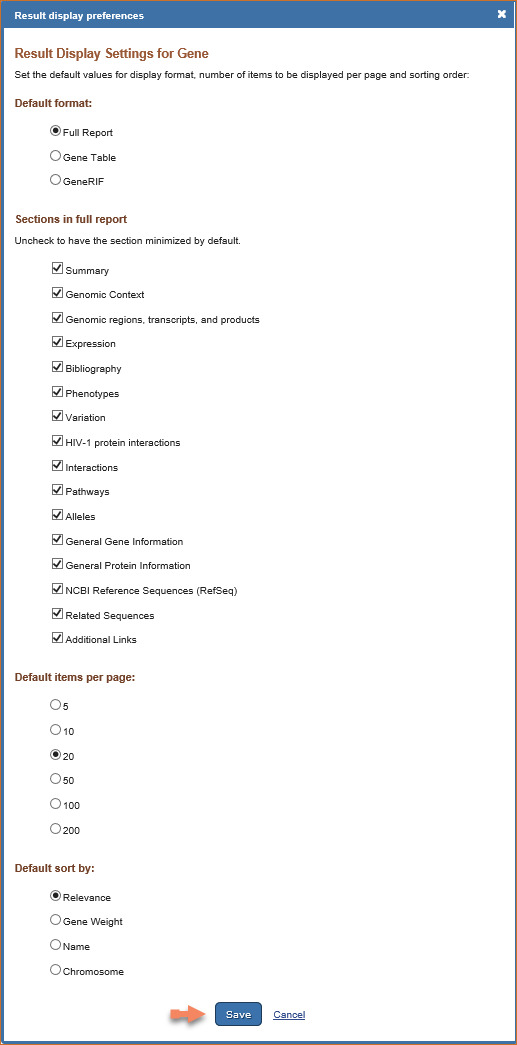
Customizing the Search Results Display
The Gene database default format for displaying search results is Full report, 20 records per page, and sorted by Relevance.
The full report display includes the following sections: Summary, Genomic Context, Genomic regions/transcripts/products, Expression, Bibliography, Phenotypes, Variation, HIV-1 protein interactions, Interactions, Pathways, Alleles, General Gene Information, General Protein Information, NCBI Reference Sequences (RefSeq), Related Sequences, and Additional Links.
To customize the search results display, log into My NCBI and click “NCBI Site Preferences” and then click “Result Display Settings” under Gene Preferences. In the resulting page select either the Full report, Gene Table, or Gene RIF format. You can specify the sections you want included in the Full report by checking the box next to the section name. For information on the different types of display formats available for the Gene database see Gene Help-display/settings.
To customize the search results display for number of records per page and sorting order, select the number of records to be displayed per page (5, 10, 20, 50, 100, or 200) and the sort order (Relevance, Gene Weight, Name. or Chromosome).
For information on Display Settings in the Gene Database, see Gene Help.
GTR Preferences
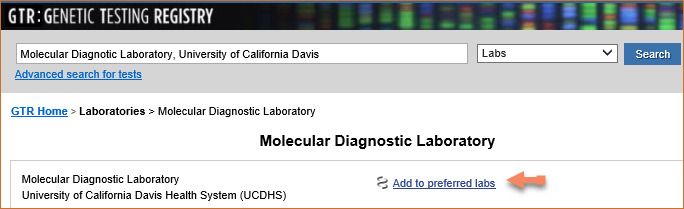
Selecting Preferred Labs
You can select your preferred Laboratories for the Genetic Testing Registry (GTR) database using My NCBI, which will help limit your search results to the tests offered by the laboratories selected.
In NCBI Site Preferences:
- 1.
Click the link “Preferred Labs” under GTR preferences.
- 2.
Click “GTR Website.” Select the Labs tab. Enter a laboratory name in the search box.
- 3.
Click the button “Add to preferred labs.” GTR video tutorials
Nucleotide Preferences
Setting up Nucleotide Filters
You can select your preferred Nucleotide filters to be active every time you run a search. You may also create your own custom filters. There is a limit of 5 filters for the Nucleotide database. For a detailed explanation on how to set up filters in My NCBI, see Working with Filters.
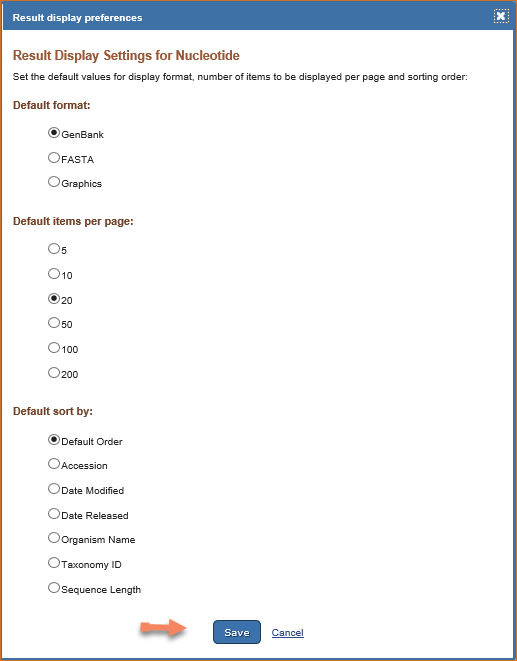
Customizing the Search Results Display
The Nucleotide database default format for displaying search results is GenBank. To customize the search results display format, log in to My NCBI and click “NCBI Site Preferences” and then click “Result Display Settings” under Nucleotide Preferences. In the resulting page select either the GenBank, FASTA, or Graphics format.
The number of records per page and sorting order can also be customized in My NCBI. For information on the different types of display formats available for the Nucleotide database see Nucleotide FAQ
Protein Preferences
Setting up Protein Filters
You can select your preferred Protein filters to be active every time you run a search. You may also create your own custom filters. There is a limit of 5 filters for the Protein database. For a detailed explanation on how to set up filters in My NCBI, see Working with Filters.
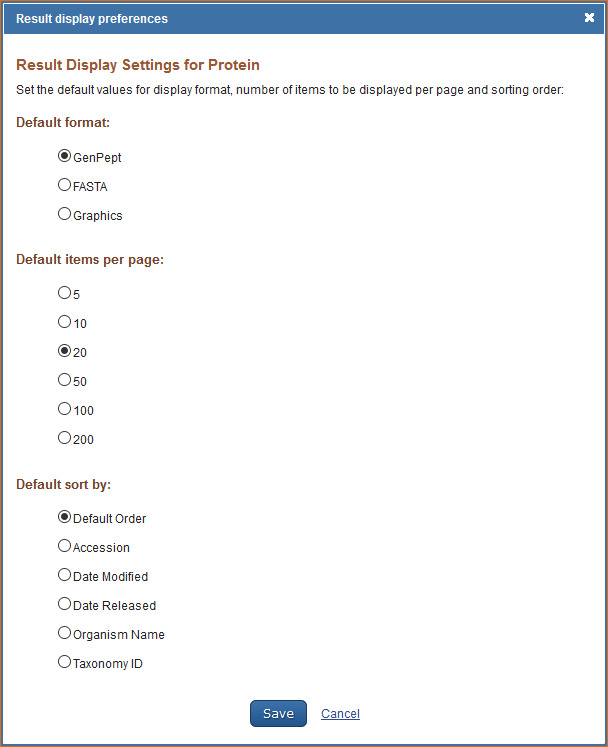
Customizing the Search Results Display
The Protein database default format for displaying search results is GenPept. To customize the search results display format, log in to My NCBI and click “NCBI Site Preferences” and then click “Result Display Settings” under Protein Preferences. In the resulting page select either the GenPept, FASTA, or Graphics format.
The number of records per page and sorting order can also be customized in My NCBI. Select the number of records to be displayed per page (5, 10, 20, 50, 100, or 200) and the sort order (Accession, Date Modified, Date Release, Organism Name, or Taxonomy ID).
For information on the different types of display formats available for the Nucleotide database see Protein FAQs
GSS Preferences
Customizing the Search Results Display
The GSS (Genome Survey Sequence) database default format for displaying search results is GSS. To customize the records display format, log into My NCBI and click “NCBI Site Preferences” and then click “Record Display Format” under GSS Preferences. In the resulting window select, either GSS, GenBank or FASTA format.
The GSS database default settings for displaying search results are: 20 records per page and sorted by Default Order. Default order follows the same display order as GenBank: last into the database first displayed. To change the number of records to display per page and sort order, select the number of records to be displayed per page (5, 10, 20, 50, 100, or 200) and to change the sort order (Accession, Date Modified, Date Release, Organism Name, or Taxonomy ID).
For information on the GSS database see Entrez Sequences Help.
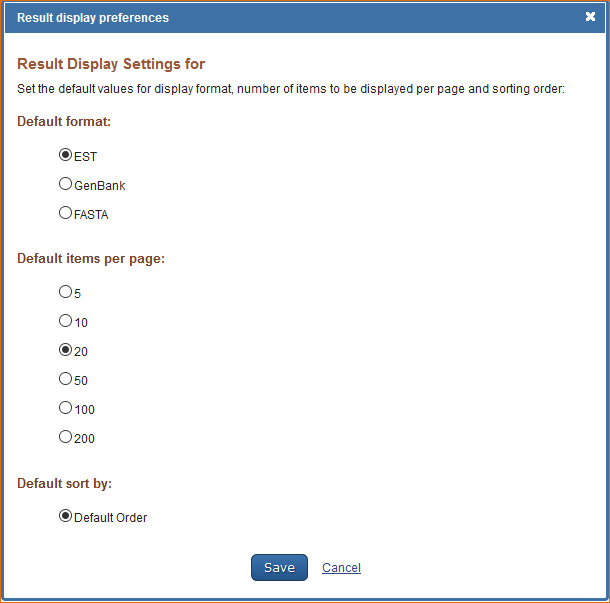
EST Preferences
Customizing the Search Results Display
The EST (Expressed Sequence Tag) database default format for displaying search results is EST. To customize the records display format, log in to My NCBI and click “NCBI Site Preferences” and then click “Record Display Format” under EST Preferences. In the resulting window select, either EST, GenBank or FASTA format.
The EST database default settings for displaying search results are: 20 records per page and sorted by Default Order. Default order follows the same display order as GenBank: last into the database first displayed. To change the number of records to display per page, select the number of records to be displayed per page (5, 10, 20, 50, 100, or 200) and to change the sort order (Accession, Date Modified, Date Release, Organism Name, or Taxonomy ID).
For information on the EST database see Entrez Sequences Help
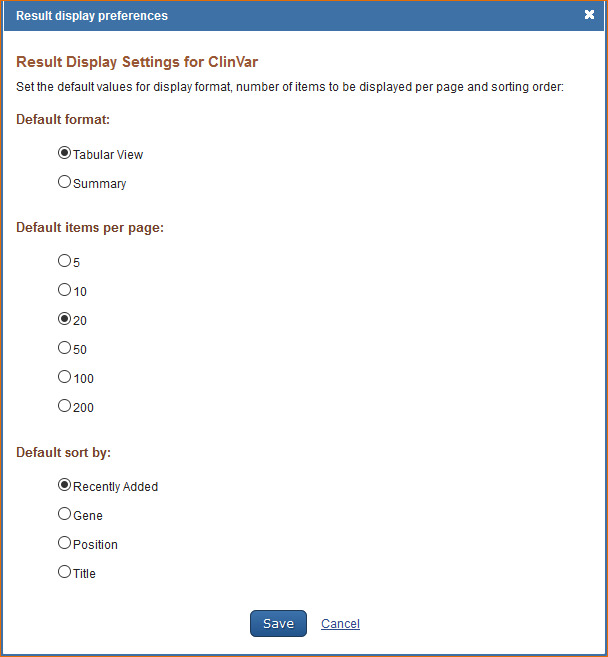
ClinVar Preferences
Customizing the Search Results Display
The ClinVar database default format for displaying results is tabular view. To customize the records display format, log in to My NCBI and click “NCBI Site Preferences” and then click “Record Display Format” under ClinVar Preferences. In the resulting window select, either Tabular View or Summary format.
The ClinVar database default settings for displaying search results are: 20 records per page and sorted by Recently Added. To change the number of records to display per page, select the number of records to be displayed per page (5, 10, 20, 50, 100, or 200) and to change the sort order (Recently Added, Gene, Position or Title).
For information on the ClinVar database see ClinVar FAQs.
MedGen Preferences
Customizing the Search Results Display
The MedGen database default settings for displaying search results are: 20 records per page and sorted by Recently Added. To change the number of records to display per page and the search results sorting order, log in to My NCBI and click “NCBI Site Preferences” and then select “Record Display Format” under MedGen Preferences. In the resulting window select the number of records to be displayed per page (5, 10, 20, 50, 100, or 200) and select the sort order for search results (Recently Added, Title, Concept ID or Semantic Type).
For information on the MedGen database see MedGen Help.

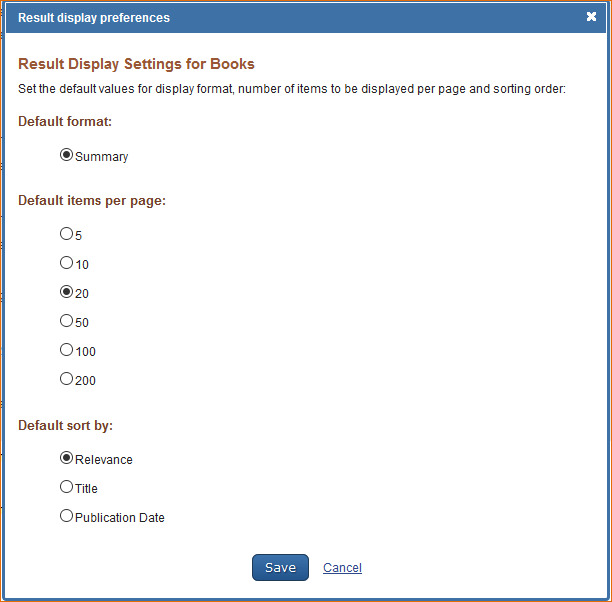
Books Preferences
Customizing the Search Results Display
The Books database default settings for displaying search results are: 20 records per page and sorted by Relevance. To change the number of records to display per page and the search results sorting order, log in to My NCBI and click “NCBI Site Preferences” and then select “Record Display Format” under Books Preferences. In the resulting window select the number of records to be displayed per page (5, 10, 20, 50, 100, or 200) and select a sort order for search results (Relevance, Title or Publication Date).
- Using Preferences - My NCBI HelpUsing Preferences - My NCBI Help
Your browsing activity is empty.
Activity recording is turned off.
See more...